In your rush to post the perfect shot of that # sinful deal of pancake at # brunch , did you thoroughly jibe that your contrast levels were on point , and the spotlight from the window in the background did n’t altogether blow out the details ? Or did you just slap on a Valencia filter and call it a day ?
There ’s nothing wrong with rushing through C. W. Post - production in hobby of those tasty , tasty likes , but ever wonder what you could be doing better ? We asked our photo editor Drew Swantak ( on Instagram,@drewswantak ) for expert tips on how to get past Insta - filter , which often do more harm than good to your photograph , by doing a usage edit job yourself . Time to turn your # nofilter into # profilter .
To ensure you do n’t get lost in a jumble of photo jargon , here ’s a ground on what the Instagram edit creature actually do :

Oren Aks/Thrillist
luminance : Pretty aboveboard , this can brighten up a dark epitome and darken a bright oneContrast : When turned up , it overdraw the darkness and lights in an image , and softens them when turned downSaturation : Increasing this append strength / intensity to the colors in your double , and vice versaWarmth : Turning this up brings out " warm " coloring ( oranges , red , and yellows , generally ) ; turning it down brings out " nerveless " coloring material ( like blues , purpleness , and viridity ) . This tools can be used to alter the modality of a photo , or to bring colors into counterpoise . Sharpen : Turning this up focuses and clarifies your trope and make believe everything a little crisperHighlights : line up this will affect all of the brightest function of your image – happen it up will make the shiny part of your simulacrum even more vivacious , and move it down will bring down the light in those sections to reveal more detail in them that may have been wash out by excessive light . This can be a huge help if a particular section of your picture is shove off out by a too - lustrous unclouded source or the Sunday . Shadows : This does essentially the same thing as Highlights , but for the dark area of an image . So turn it up to see what ’s hiding in the shadow , or turn it down to darken .
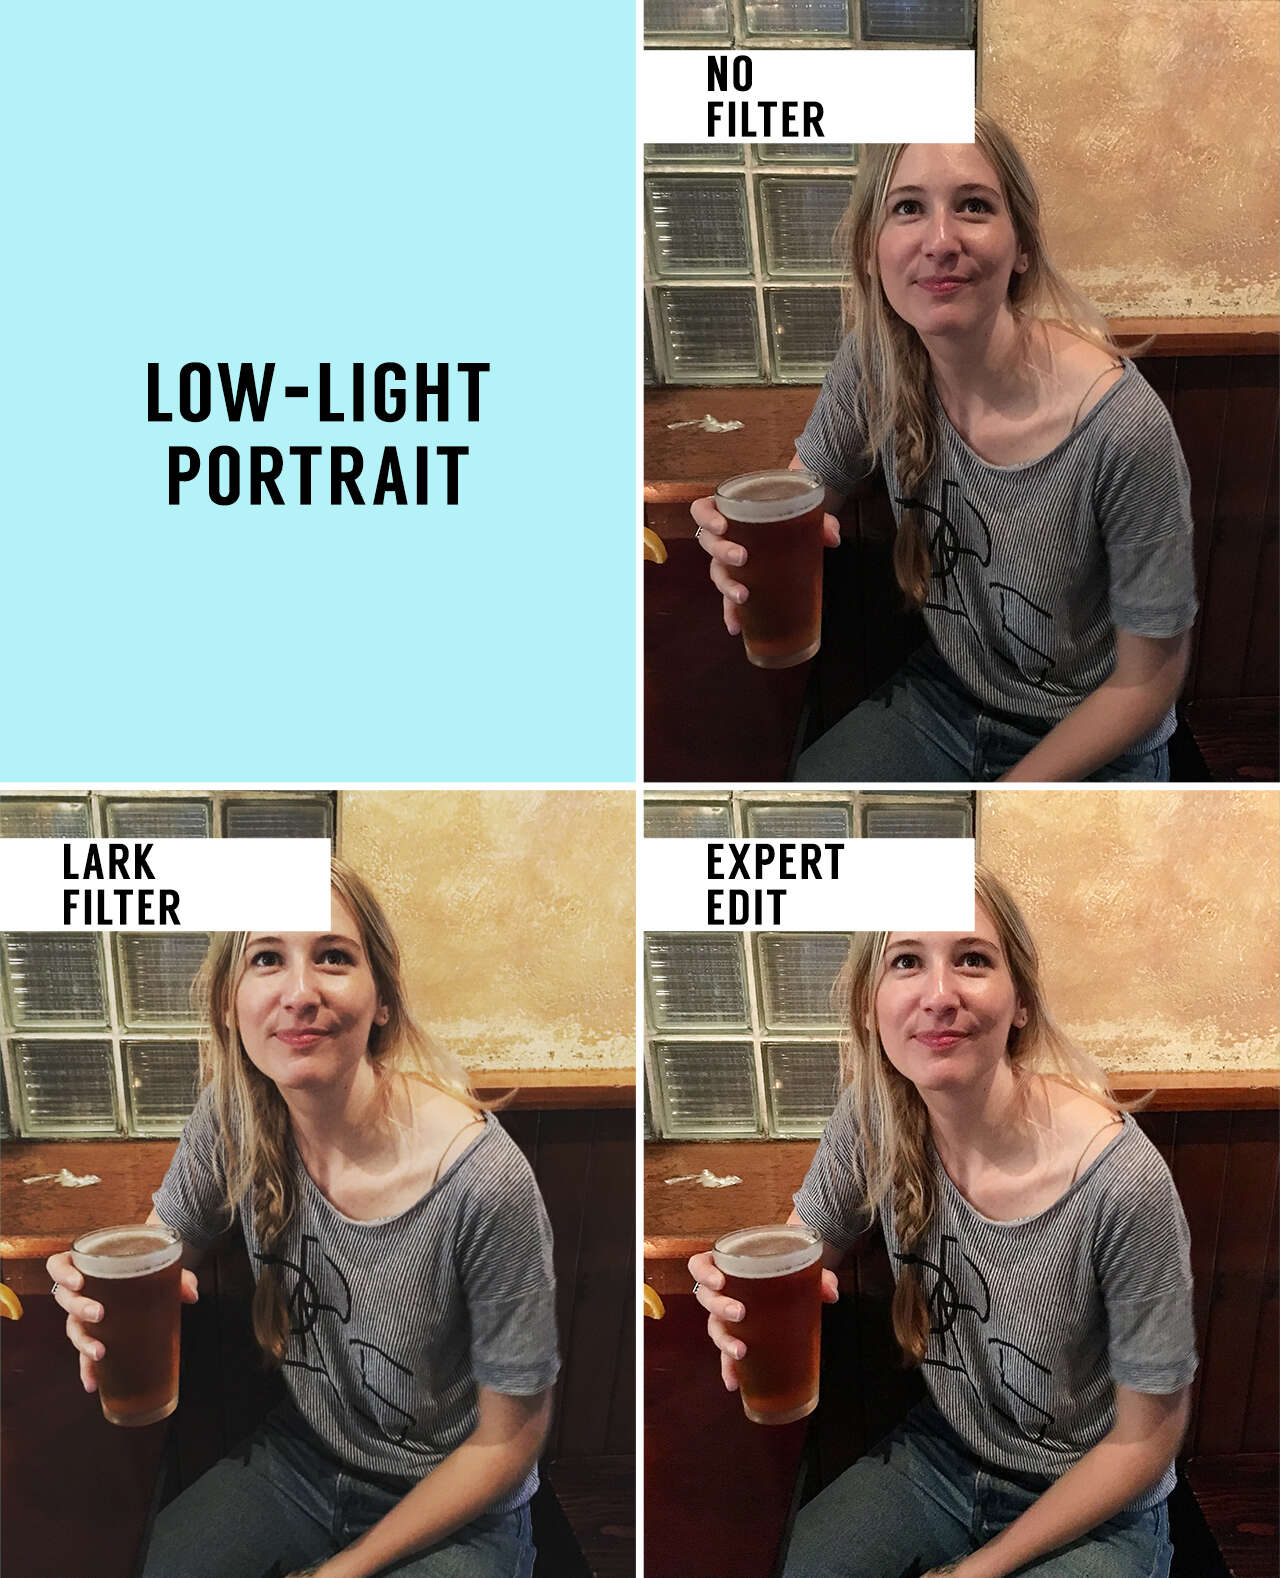
Low-light portrait
beneficial filter pick : LarkThe edit : For this range , we bring the brightness up about 40 points to correct for the crappy lighting , brought contrast up 20 tip , increased the warmth by 10 points , brought the vividness up to five , and sharpened it up to10 .
Brightness and contrast do a draw of the oeuvre in a low - light edit . Also , it ’s of import not to over - saturate . It can be tempting , peculiarly if the firing is poor , but a little move a long way ( especially when you ’re turning it up ) . An over - saturate picture often looks like it ’s been over - edit , and you do n’t require that .
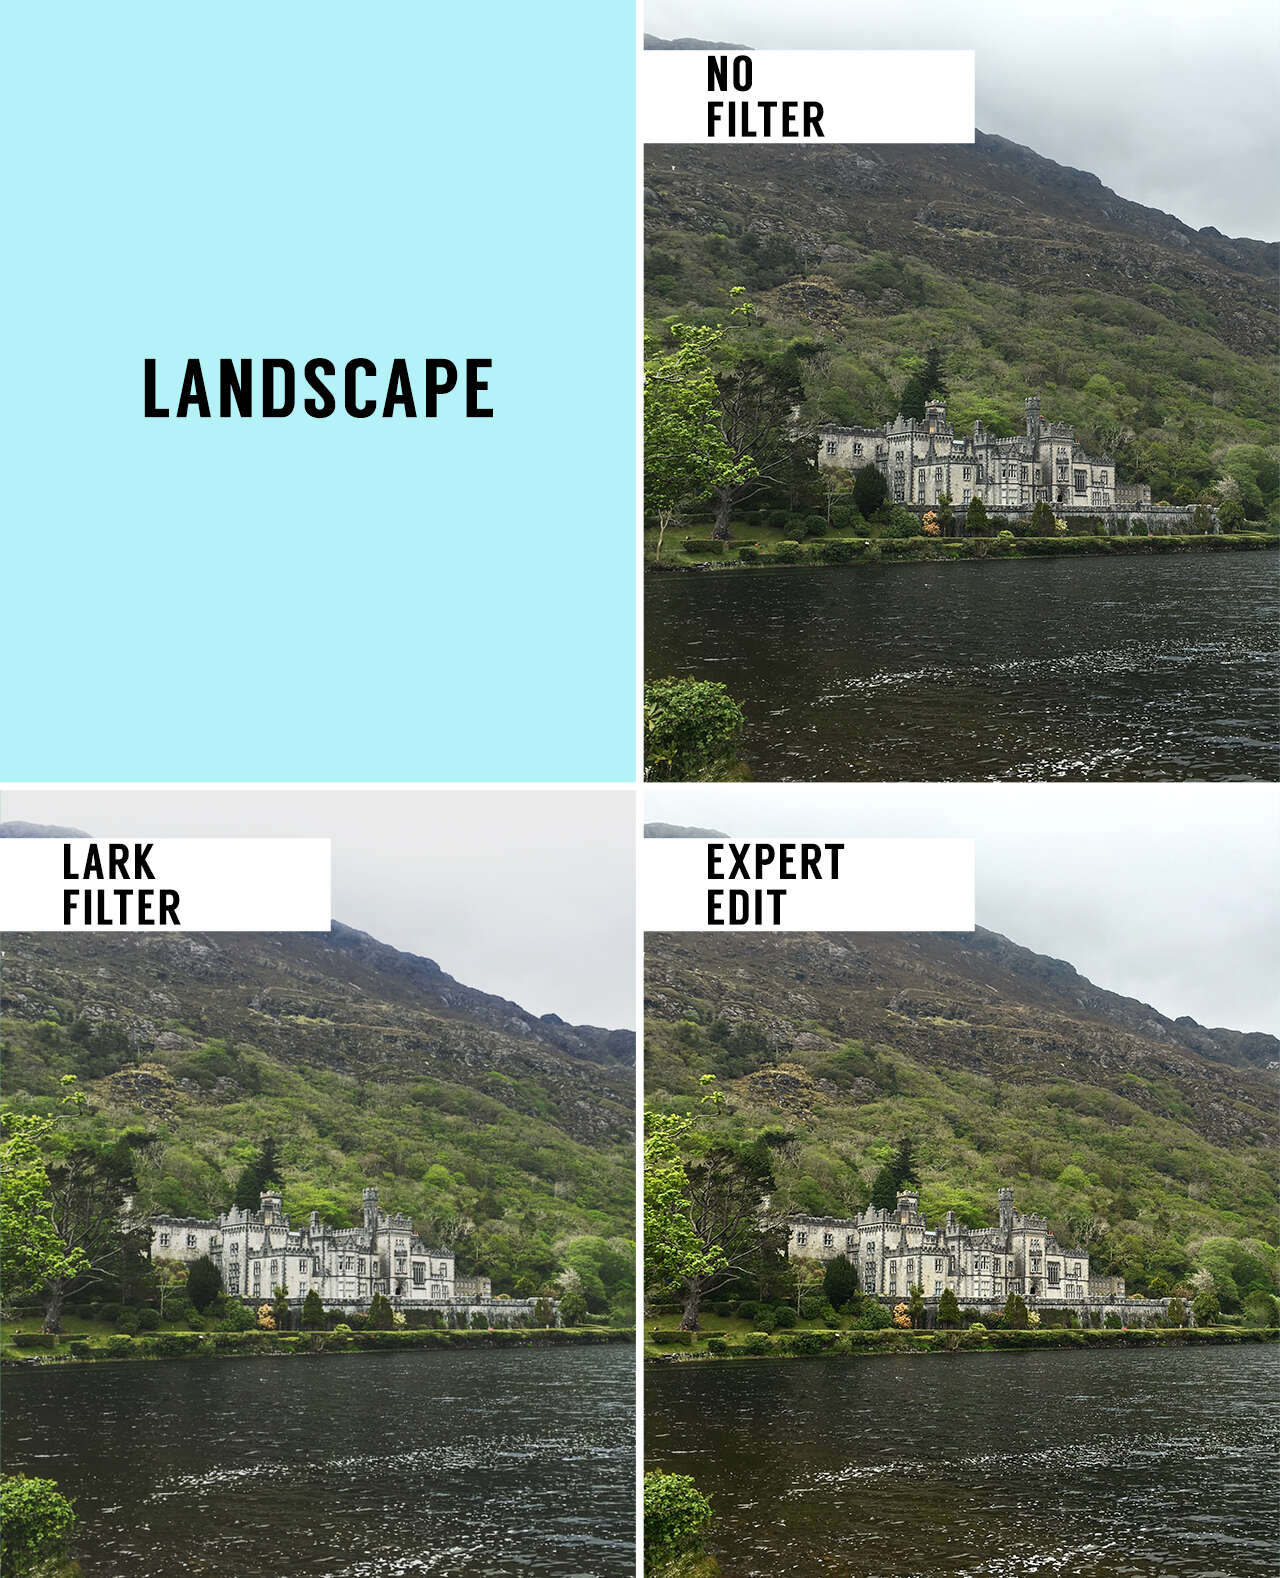
Landscape
Best filter option : LarkThe edit : For this we bumped up the contrast by 25 point , kick downstairs up smartness by 20 , and increase the distinctness by 10 . We also raised the warmth by 30 to balance the image , which balanced out the colors of original image .
The heat tool is particularly effective in enhancing certain elements of nature . In this instance , the greens in the original image look too blue , so boosting the warmheartedness added yellow tones to equilibrate the green and make it pop more . With nature shots in particular , utilize the passion putz to bring out the temper or season you ’re try on to trance .
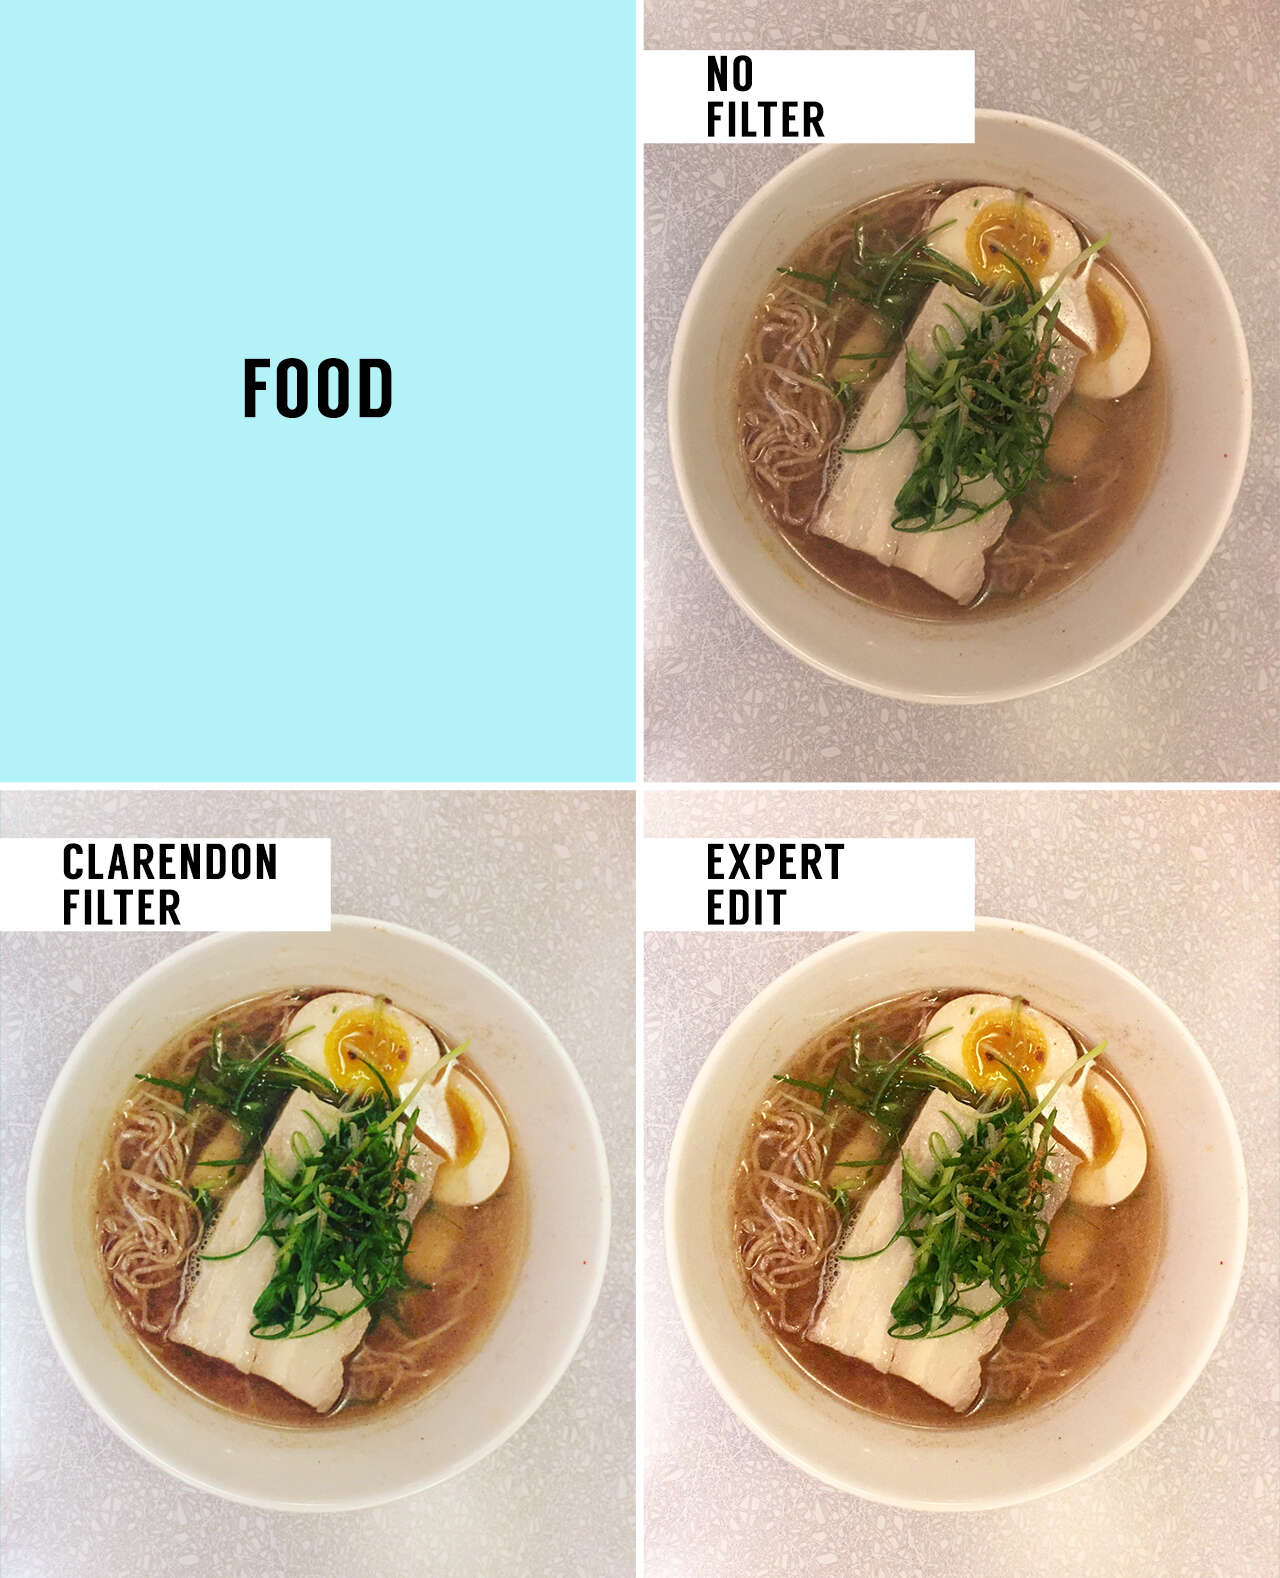
Food
dependable filter option : ClarendonThe edit : For this overhead ramen scud , we bestow up the demarcation and luminousness 60 and 40 spot , respectively . to boot , we took the warmth down 20 point in time , and brought both saturation and keenness up 10 points , to make details more pronounced and give it an overall more appetising appearance .
As you’re able to see , the original is sort of a mishmash of boring beige tones , which is no good when you ’re dealing with most subjects , specially food . bring up the luminance , plus lend contrast to dramatically differentiate between light and wickedness , allows the details to pop out and consequently makes it look a whole lot more appetizing . Opposite of what we did in the green - imbue landscape photo , throw away the warmth accentuate the Brown and beiges in the ramen bowl . Drew suggest that whenever possible you should buck solid food pic under diffused natural lightness ( for instance , light come through a windowpane ) , as it ’ll be much light to get a comme il faut guessing .
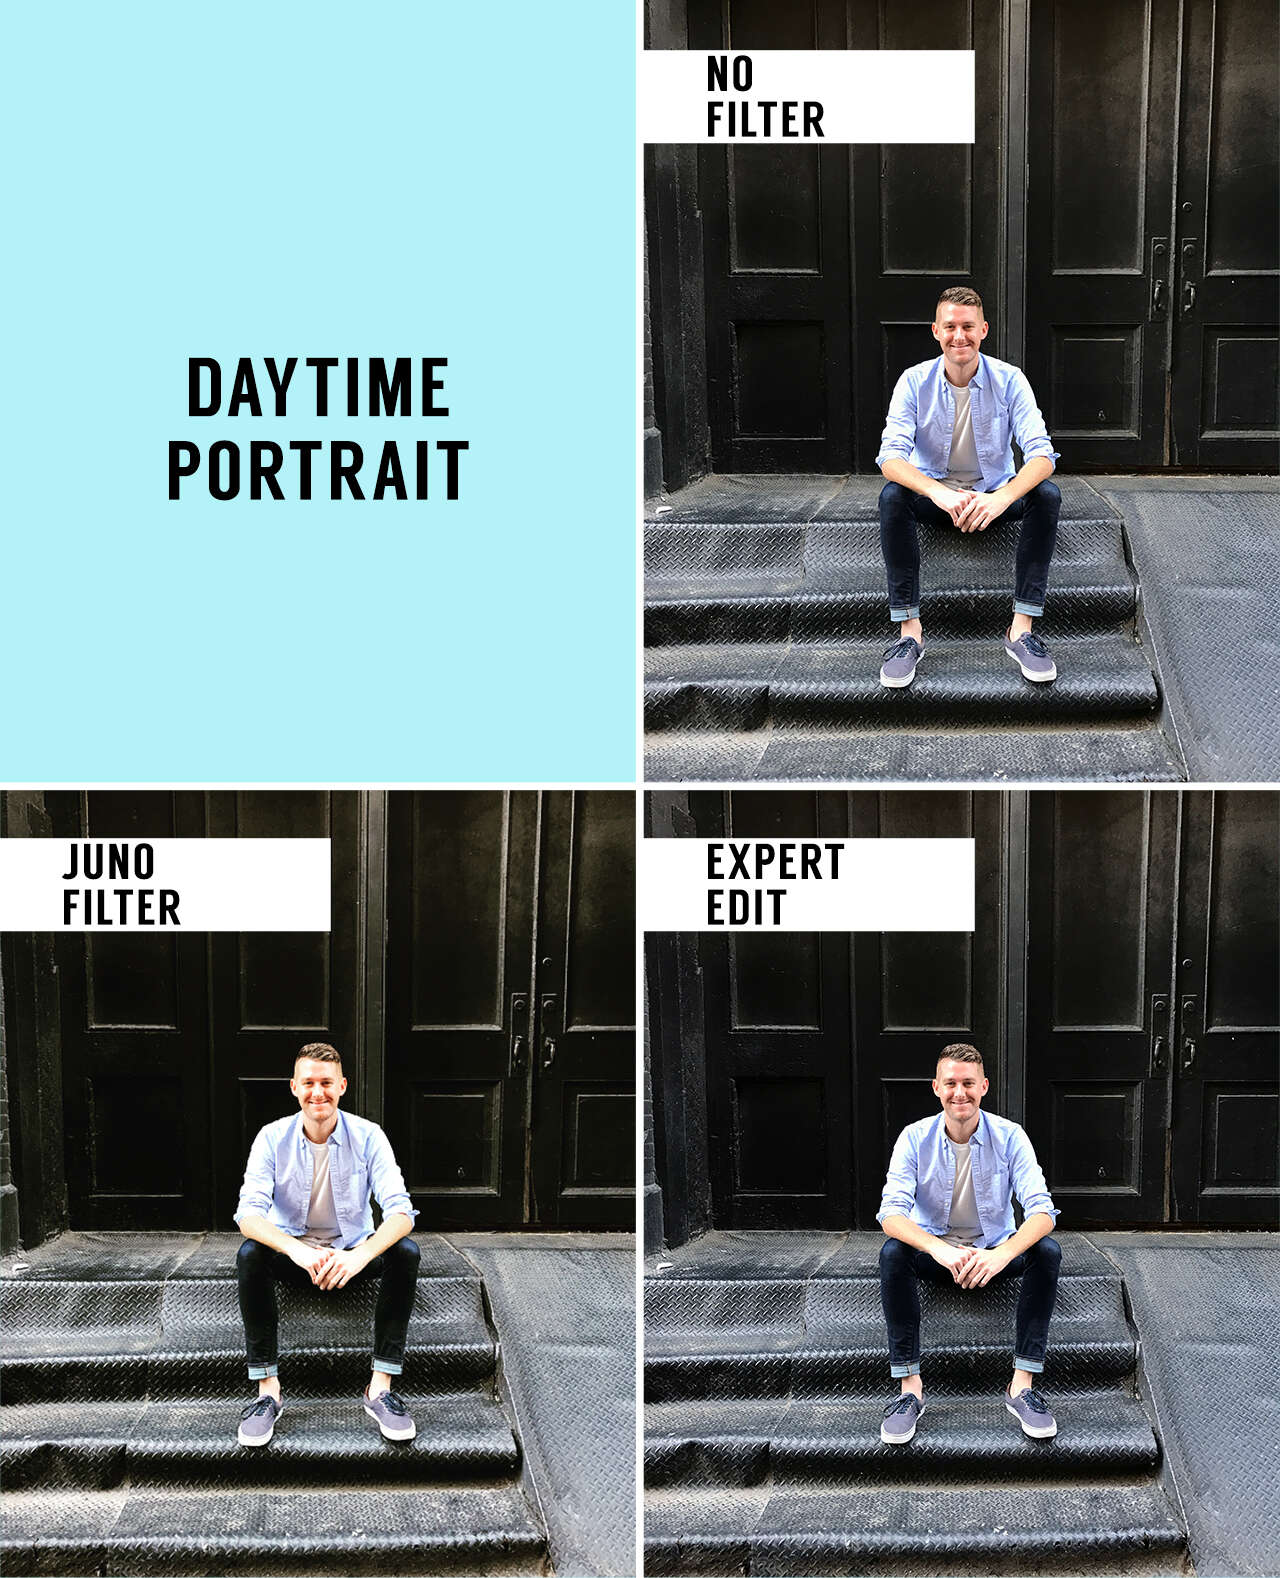
Daytime portrait
Best filter choice : JunoThe edit : For this daytime portrait , we bumped up the contrast to 30 , decreased the warmth and vividness by 10 for each one , and sharpened it by 10 .
Drew remind us that you should do what you may to pen the good raw prototype so edits are minimum . In this particular illustration , that would have stand for activate the camera ’s HDR ( high dynamic kitchen range ) feature , which captures the same epitome multiple time at unlike exposure levels and combines them to create a composite image in which the darks are n’t too dark and the brights are n’t too undimmed .
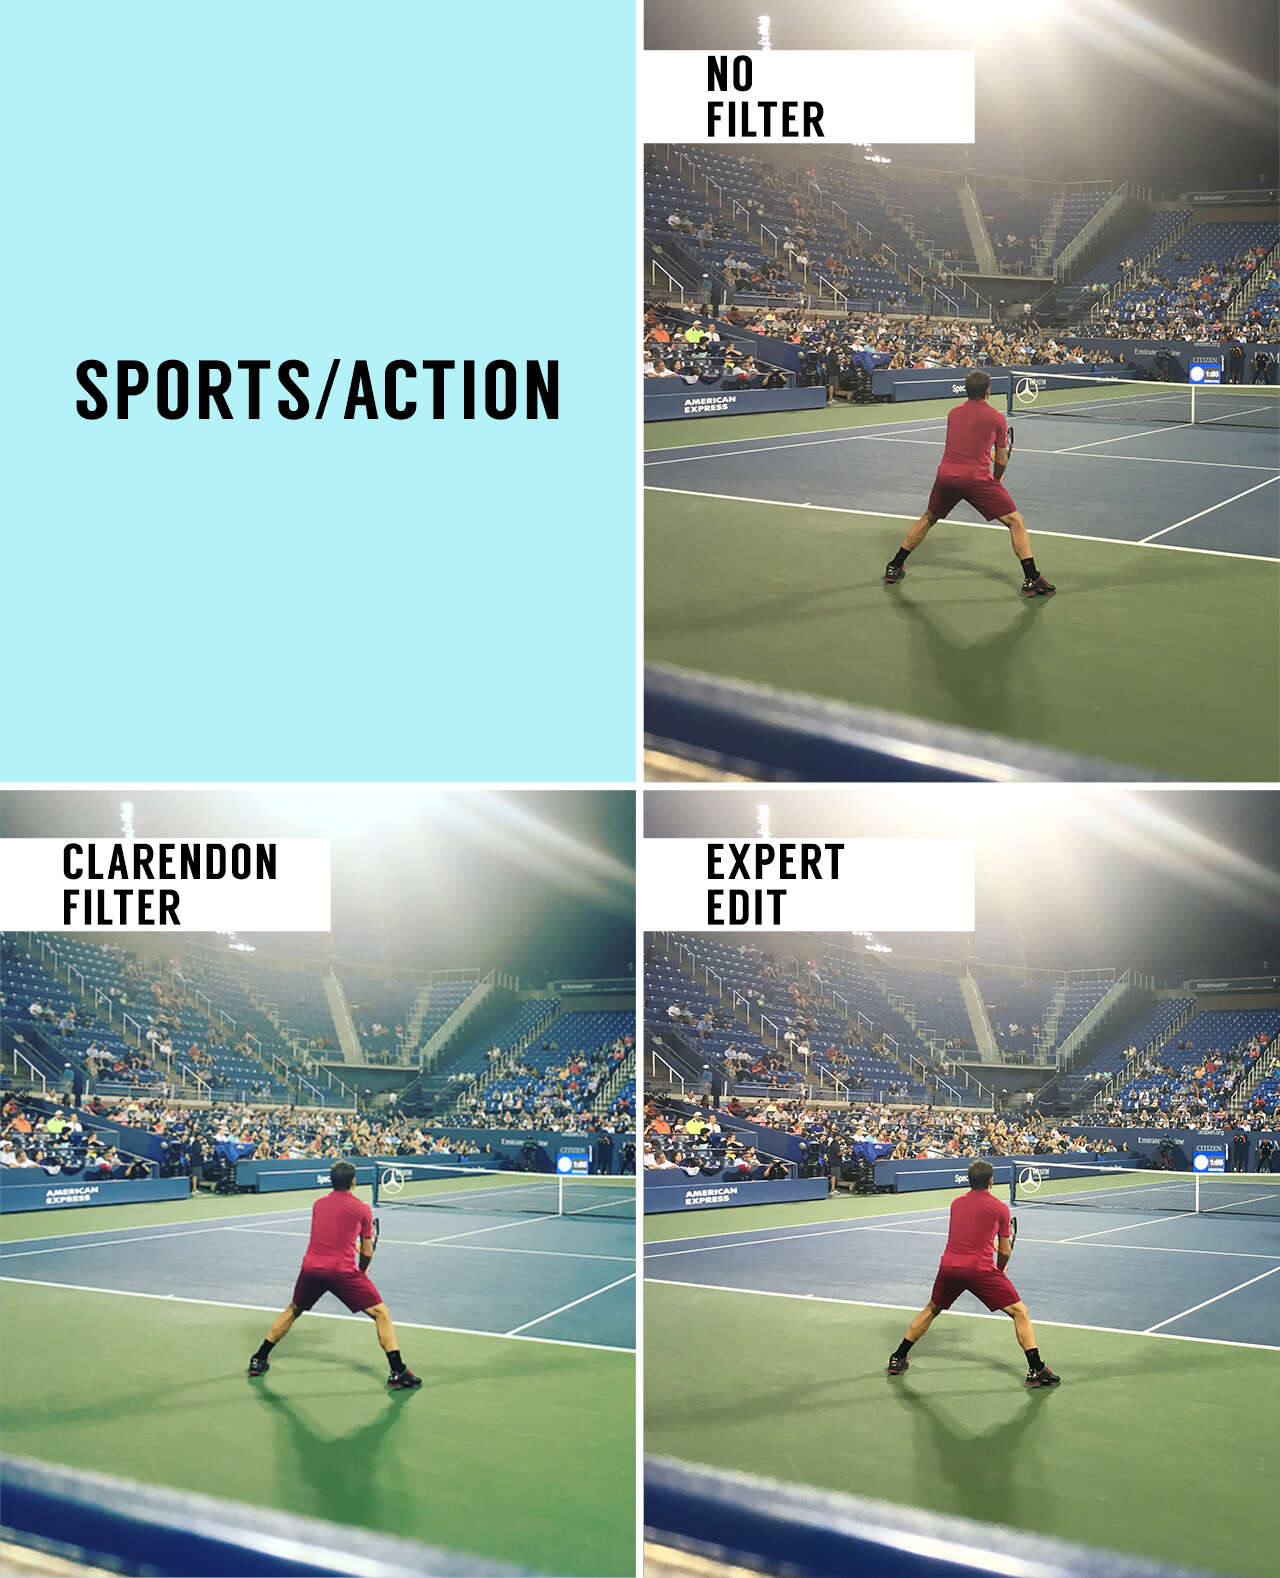
Sports/action
The best filter : ClarendonThe edit : This one call for to be neaten up a bit , then we bring the light up by 30 , the line up by 50 , and reduced vividness by 30 . Because of the striking style the light were hitting , we also took down the shadows by 10 and brought up pungency by 10 .
To avoid the dramatic glare of the overhead Light Within , Drew notes that we could have used our manus ’s fantasm like a shield to decoct how much of the luminance was hitting the lens when we ab initio took the photo .
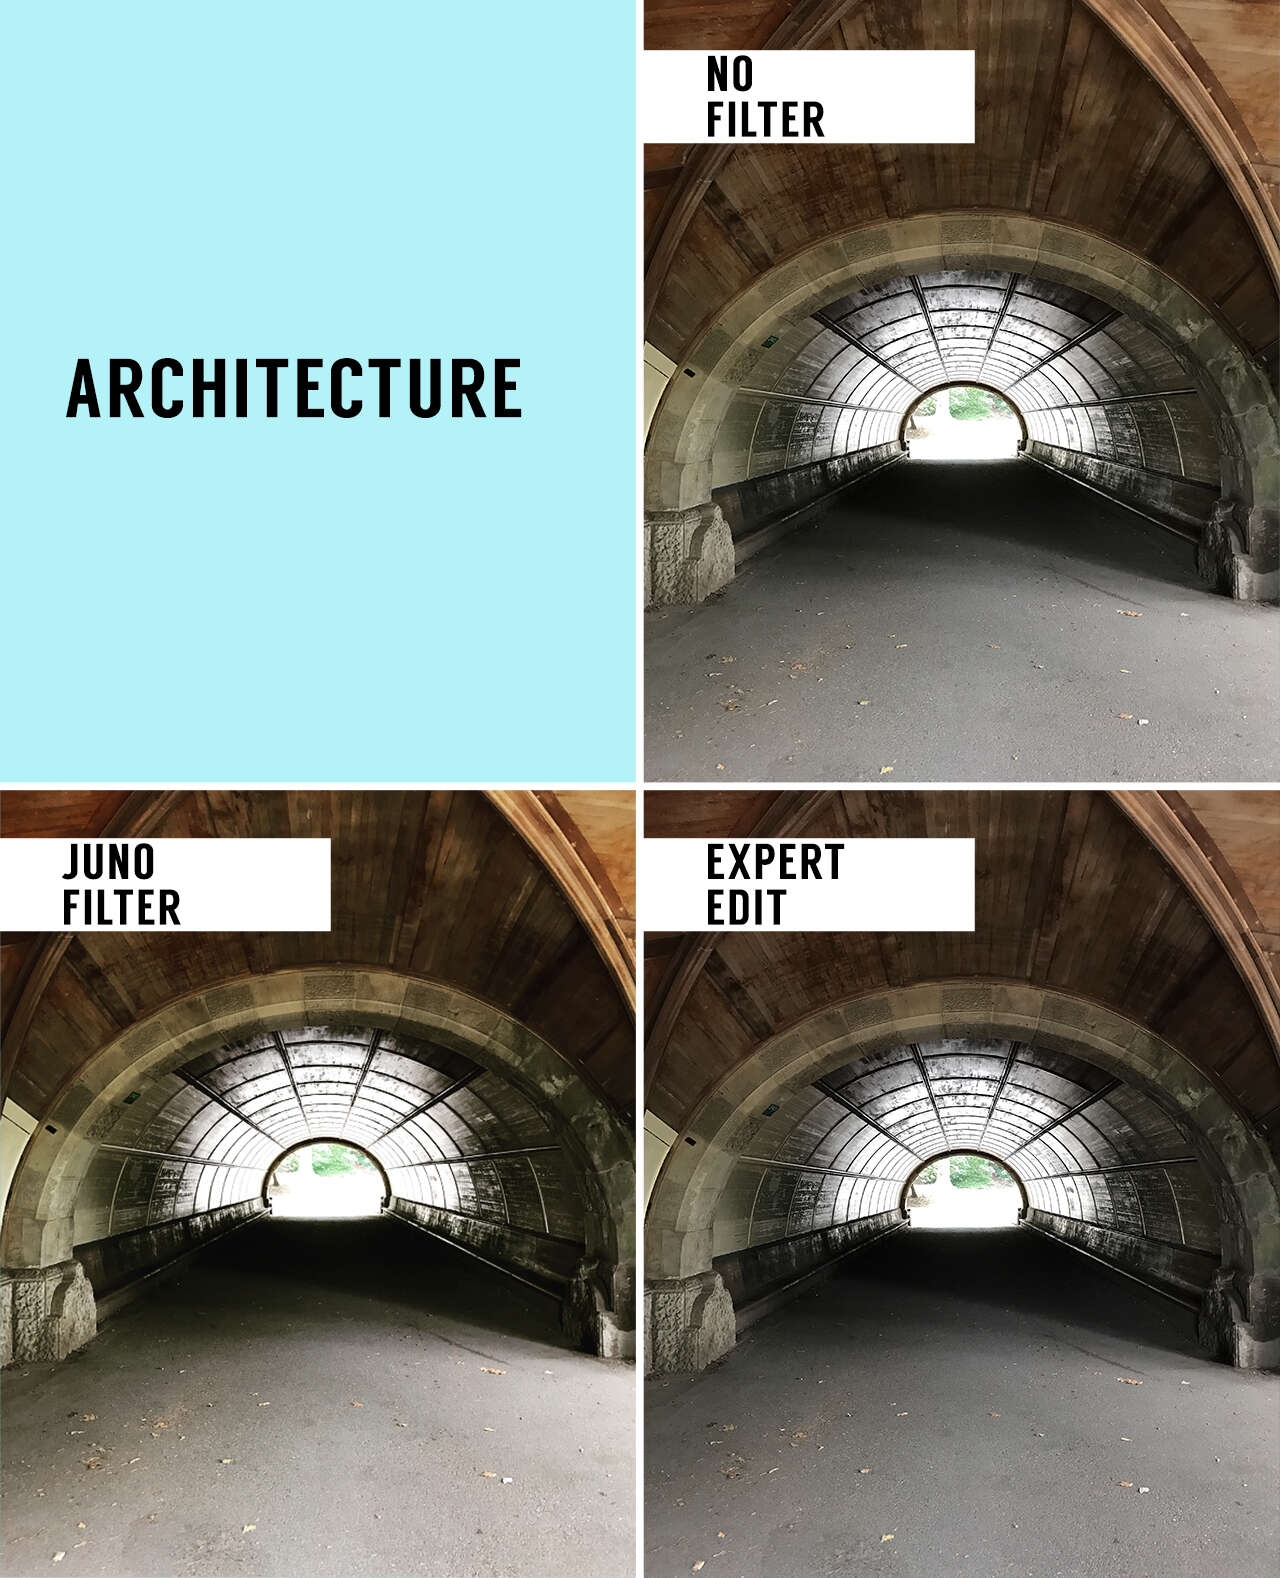
Architecture
good filter choice : JunoThe edit : For this architectural slam , we bring down both highlights and tincture by 30 to get a better picture of both the tincture and the glare inside the tunnel , brought saturation down by 20 , and sharpened it up by 10 .
To the untrained eye , the differences between these three are trifling . There have been some subtle variety made , but the fact that it required very few edits talk to the whimsy that a low touch is sometimes all you require . manifestly details are important in architecture , so taper does a quite a little to pronounce some of the faint elements here in the wood grain and Harlan Stone .
Drew also noted that there were two ways to go with this image edit – either essay to pull out more detail from the highlights ( the end of the burrow ) , or do what we did here , continue the highlight completely blown out / white . In the end , though , it ’s up to your personal penchant .
Oren Aks/Thrillist
contract up herefor our daily Thrillist email , and get your fix of the estimable in solid food / drinking / playfulness .
Oren Aks/Thrillist
Oren Aks/Thrillist
Oren Aks/Thrillist
Oren Aks/Thrillist
Oren Aks/Thrillist
